
Finding the Radius of a Cone: A Dynamic 3D Geometry Exploration
Loading the math board and drawing, please wait…
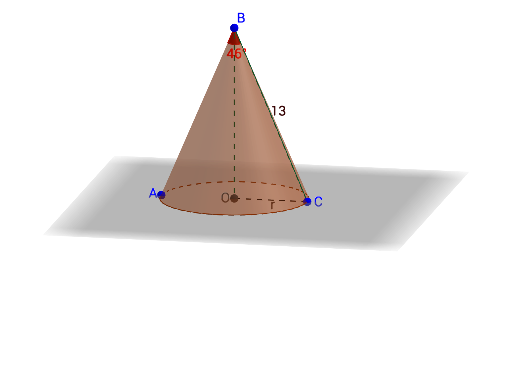
This GeoGebra example demonstrates how to determine the radius of a cone using a dynamic 3D model. It visually shows the relationship between the cone's slant height, vertical height, and base radius, emphasizing the right triangle formed by these elements and the Pythagorean theorem. The construction employs key GeoGebra commands: Cone to create the solid, Segment for the slant edge, Angle to mark relevant angles, Polygon for auxiliary cross-sections, and Intersect to locate critical points. Interactive sliders allow users to vary parameters and observe the resulting radius changes in real time. This resource is ideal for middle and high school students (grades 9-12) studying solid geometry, and serves as an effective teaching tool for classroom demonstrations or independent exploration of cone properties.
GeoGebra Commands & Parameters
Intersect(xAxis, zAxis) → OCone(O, B, 5.0795) → a, c, bSegment(B, C) → fAngle(A, B, C) → αPolygon(B, O, C) → poly1, c_1, b_1, oAngle(B, O, C) → βSegment(O, C) → r
AI Drawing Prompt Reference
Create a 3D cone with its apex at the origin and base center on the vertical axis. The base radius is adjustable via a slider. Show the slant height, vertical height, and base radius forming a right triangle, with the slant edge and base radius drawn as segments. Mark an angle at the apex. Add an auxiliary triangular cross-section connecting the apex, base center, and a point on the base rim, and indicate the right angle at the base center. The model should clearly illustrate the geometric relationship for finding the radius.
The prompt above was compiled from the original drawing commands and is for reference only.