
Rhombus Properties by GMMDC
Loading the math board and drawing, please wait…
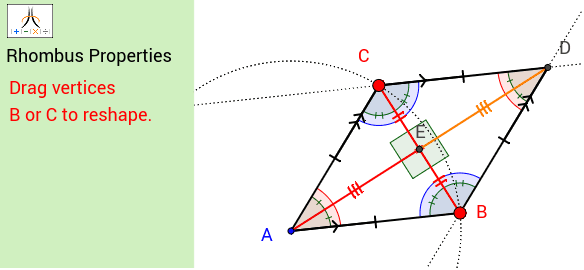
This example demonstrates the properties of a rhombus. Key mathematical concepts include linear regression, dilation, arithmetic operations, and translation. Using GeoGebra commands such as Circle, Point, Segment, Line, Intersect, Angle, and Midpoint, the construction of a rhombus and the observation of its properties are illustrated. Suitable for middle school and above students or teachers.
GeoGebra Commands & Parameters
Circle(A, B) → cPoint(c) → CSegment(A, C) → aSegment(A, B) → bLine(C, b) → dLine(B, a) → eIntersect(d, e) → DSegment(A, D) → fSegment(C, B) → gSegment(C, D) → hSegment(B, D) → iIntersect(f, g) → ESegment(E, C) → jSegment(E, B) → kSegment(A, E) → lSegment(D, E) → mAngle(B, A, D) → αAngle(D, A, C) → βAngle(g, f) → γAngle(A, E, B) → δAngle(C, E, A) → εAngle(D, E, C) → ζAngle(B, A, C) → ηAngle(C, D, E) → θAngle(E, D, B) → ιAngle(C, D, B) → κAngle(A, C, E) → λAngle(E, C, D) → μAngle(A, C, D) → νAngle(E, B, A) → ξAngle(D, B, E) → οAngle(D, B, A) → ρMidpoint(C, D) → FMidpoint(D, B) → GMidpoint(A, B) → HMidpoint(C, A) → ISegment(C, F) → nSegment(A, H) → pSegment(I, C) → qSegment(G, D) → rCorner(1, 1) → Cnr1Corner(1, 2) → Cnr2Corner(1, 3) → Cnr3Corner(1, 4) → Cnr4Polygon(CN1, CN2, CN3, CN4) → Panel, cn1, cn2, cn3, cn4Polygon(Cnr1, Cnr2, Cnr3, Cnr4) → Frame, cnr1, cnr2, cnr3, cnr4
AI Drawing Prompt Reference
Draw a rhombus to demonstrate its properties. Start by drawing two intersecting circles and finding their intersection points. Connect the center of each circle to the intersection points to form two segments. From these segments, draw perpendicular lines to find the feet of the perpendiculars, and connect these feet to the centers to complete the rhombus. Label the diagonals, angles, and midpoints, and show the intersection point of the diagonals. Finally, connect the midpoints of the four sides to form an inscribed quadrilateral, and label all key points and segments.
The prompt above was compiled from the original drawing commands and is for reference only.