
Fraction Multiplication Demo by Lee W Fisher
Loading the math board and drawing, please wait…
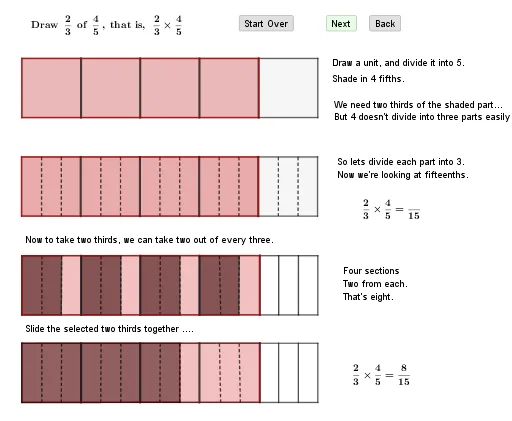
This example demonstrates fraction multiplication through a geometric area model. It visually represents fractions as lengths and widths of rectangles in a coordinate system, showing how the product of two fractions corresponds to the area of the resulting rectangle. The core mathematical concept is the rule for multiplying fractions: multiply numerators together and denominators together. Construction uses Polygon to draw rectangles representing fractions, Point to mark key points, Segment for auxiliary lines, and Intersect to identify intersections. Suitable for upper elementary or middle school mathematics classes, helping students build geometric intuition for fraction multiplication, and can serve as a teaching demonstration tool for educators.
GeoGebra Commands & Parameters
Polygon(A, B, C, D) → q1, a, b, c, dPoint(d) → ESegment(E, F) → fPoint(d) → GSegment(G, H) → gPoint(b) → IPoint(d) → JSegment(I, J) → hSegment(K, L) → iPolygon(A_1, B_1, C_1, D_1) → q1_1, a_1, b_1, c_1, d_1Point(d_1) → E_1Segment(E_1, F_1) → f_1Point(d_1) → G_1Segment(G_1, H_1) → g_1Point(b_1) → I_1Point(d_1) → J_1Segment(I_1, J_1) → h_1Segment(K_1, L_1) → i_1Point(d_1) → MPoint(b_1) → NSegment(M, N) → jPoint(d_1) → OSegment(O, P) → kPoint(d_1) → QSegment(Q, R) → lPoint(d_1) → SPoint(b_1) → TSegment(S, T) → mPoint(d_1) → UPoint(b_1) → VSegment(U, V) → nPoint(d_1) → WPoint(b_1) → ZSegment(W, Z) → pPoint(d_1) → M_1Segment(M_1, N_1) → qPoint(d_1) → O_1Segment(O_1, P_1) → rPoint(d_1) → Q_1Point(b_1) → R_1Segment(Q_1, R_1) → sPoint(d_1) → S_1Point(b_1) → T_1Segment(S_1, T_1) → tPolygon(A, B, K, L) → q2, a_2, b_2, k_1, l_1Polygon(A_2, B_2, C_2, D_2) → q1_2, a_3, b_3, c_2, d_2Point(d_2) → E_2Segment(E_2, F_2) → f_2Point(d_2) → G_2Segment(G_2, H_2) → g_2Point(b_3) → I_2Point(d_2) → J_2Segment(I_2, J_2) → h_2Segment(K_2, L_2) → i_2Point(d_2) → M_3Point(b_3) → N_3Segment(M_3, N_3) → j_1Point(d_2) → O_3Segment(O_3, P_3) → k_2Point(d_2) → Q_3Segment(Q_3, R_3) → l_2Point(d_2) → S_3Point(b_3) → T_3Segment(S_3, T_3) → m_1Point(d_2) → U_1Point(b_3) → V_1Segment(U_1, V_1) → n_1Point(d_2) → W_1Point(b_3) → Z_1Segment(W_1, Z_1) → p_1Point(d_2) → M_2Segment(M_2, N_2) → q_1Point(d_2) → O_2Segment(O_2, P_2) → r_1Point(d_2) → Q_2Point(b_3) → R_2Segment(Q_2, R_2) → s_1Point(d_2) → S_2Point(b_3) → T_2Segment(S_2, T_2) → t_1Polygon(A_1, B_1, K_1, L_1) → q3, a_4, b_4, k_3, l_3Polygon(A_2, B_2, P_3, O_3) → q4, a_5, b_5, p_3, o_3Polygon(E_2, F_2, T_3, S_3) → q5, e_2, f_3, t_3, s_3Polygon(G_2, H_2, Z_1, W_1) → q6, g_3, h_3, z_1, w_1Polygon(J_2, O_2, P_2, I_2) → q7, j_2, o_2, p_2, i_3Polygon(A_2, B_2, K_2, L_2) → q8, a_6, b_6, k_4, l_4Polygon(A_3, B_3, C_3, D_3) → q1_3, a_7, b_7, c_3, d_3Point(d_3) → E_3Segment(E_3, F_3) → f_4Point(d_3) → G_3Segment(G_3, H_3) → g_4Point(b_7) → I_3Point(d_3) → J_3Segment(I_3, J_3) → h_4Segment(K_3, L_3) → i_4Point(d_3) → M_5Point(b_7) → N_5Segment(M_5, N_5) → j_3Point(d_3) → O_5Segment(O_5, P_5) → k_5Point(d_3) → Q_5Segment(Q_5, R_5) → l_5Point(d_3) → S_4Point(b_7) → T_4Segment(S_4, T_4) → m_2Point(d_3) → U_2Point(b_7) → V_2Segment(U_2, V_2) → n_2Point(d_3) → W_2Point(b_7) → Z_2Segment(W_2, Z_2) → p_4Point(d_3) → M_4Segment(M_4, N_4) → q_2Point(d_3) → O_4Segment(O_4, P_4) → r_2Point(d_3) → Q_4Point(b_7) → R_4Segment(Q_4, R_4) → s_2Point(d_3) → S_5Point(b_7) → T_5Segment(S_5, T_5) → t_2Polygon(A_3, B_3, K_3, L_3) → q8_1, a_8, b_8, k_6, l_6Polygon(A_3, D_3, C_3, B_3) → q9, a_{10}, d_4, c_4, b_{10}Intersect(a_8, l_6) → U_3Intersect(a_8, b_8) → V_3Intersect(p_4, b_8) → W_3Point(p_4) → Z_3Polygon(U_3, V_3, W_3, Z_3) → q10, u_3, v_3, w_3, z_3
AI Drawing Prompt Reference
Draw a coordinate system with two adjacent rectangles, each representing a fraction. The first rectangle has its length and width divided into segments corresponding to the numerator and denominator of the first fraction, with internal lines marking the subdivisions. The second rectangle, of different dimensions, similarly represents the second fraction. Between them, construct an overlapping region formed by the intersection of their sides, which visually represents the product of the two fractions. Use line segments to connect key points, label the lengths and widths, and highlight the area corresponding to the product. The overall figure demonstrates fraction multiplication through a geometric area model.
The prompt above was compiled from the original drawing commands and is for reference only.