
圆锥体与坐标几何
几何画板及绘图内容加载中,请稍等……
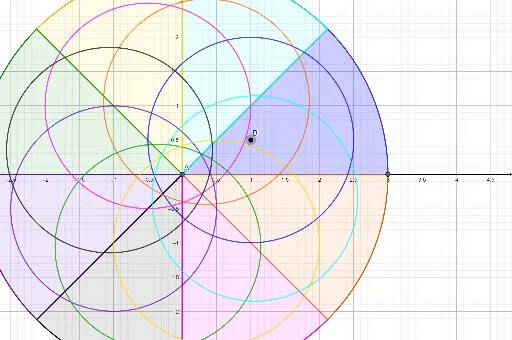
①本范例演示了如何通过 GeoGebra 构建圆锥体并分析其几何属性;②涉及的核心数学概念包括坐标几何、立体几何、向量运算和旋转变换;③作图要点:使用了 Intersect(交集)、Point(点)、Circle(圆)、Line(直线)、Rotate(旋转)、CircleSector(扇形)等命令和对象来构建圆锥体的关键元素;④适合高中及以上学生学习和理解立体几何与解析几何的结合应用。
GeoGebra 命令及参数
Intersect(xAxis, yAxis) → APoint(xAxis) → B_1Circle(A, B_1) → cPoint(xAxis) → CPoint(xAxis) → DLine(C, D) → fPoint(yAxis) → EPoint(yAxis) → FLine(E, F) → gRotate(f, 45°, (0, 0)) → f'Rotate(g, 45°, (0, 0)) → g'Intersect(c, f, 2) → GIntersect(c, f', 2) → HCircleSector(A, G, H) → dIntersect(c, g, 2) → ICircleSector(A, (2.1213203435596424, 2.121320343559642), I) → eIntersect(c, g', 2) → JCircleSector(A, (0, 3), J) → hIntersect(c, f, 1) → KCircleSector(A, (-2.1213203435596424, 2.121320343559643), K) → kIntersect(c, f', 1) → LCircleSector(A, (-3, 0), L) → pIntersect(c, g, 1) → MCircleSector(A, L, M) → qIntersect(c, g', 1) → NCircleSector(A, M, N) → rCircleSector(A, (2.1213203435596424, -2.121320343559643), G) → sCircle(B, O) → tRotate(t, 45°, A) → t'Rotate(t, 90°, A) → t'_1Rotate(t, 135°, A) → t'_2Rotate(t, 180°, A) → t'_3Rotate(t, 225°, A) → t'_4Rotate(t, 270°, A) → t'_5Rotate(t, 315°, A) → t'_6
AI 绘图提示语参考
画一个圆锥,首先在坐标系的x轴和y轴交点处画一个点,然后以该点为圆心,向x轴引出一条射线,画一个圆。接着,在x轴上任意取两点,画一条直线。将这条直线和圆的交点连接到圆心,形成圆锥的侧面。最后,将侧面旋转45度,并画出相应的扇形区域,以展示圆锥的几何特性。
以上提示语为根据原始绘图命令整理而来,仅供参考。