
Step 2 of Rectangle Translation Tessellation
Loading the math board and drawing, please wait…
In collections
Tess 1
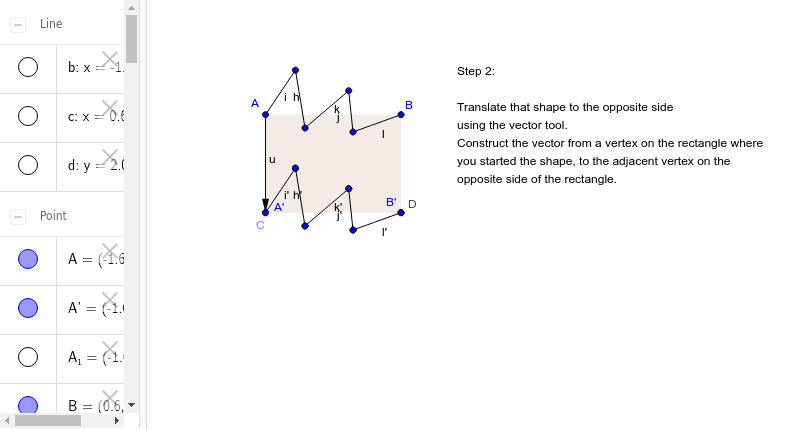
This example demonstrates the second step of rectangle translation tessellation. The core mathematical concepts involved are geometric transformations, specifically translation. Using GeoGebra commands such as Segment, OrthogonalLine, Point, Intersect, Polygon, Vector, and Translate, the construction of the translated rectangle is shown. Suitable for students at the middle school level and above learning about geometric transformations.
GeoGebra Commands & Parameters
Segment(A, B) → aOrthogonalLine(A, a) → bOrthogonalLine(B, a) → cPoint(b) → COrthogonalLine(C, b) → dIntersect(c, d) → DSegment(A, C) → eSegment(C, D) → fSegment(D, B) → gPolygon(A, B, D, C) → poly1, a_1, b_1, d_1, c_1Segment(A_1, B_1) → a_2Segment(E_1, F_1) → i_1Segment(F_1, G_1) → j_1Segment(G_1, H_1) → k_1Segment(H_1, I_1) → l_1Segment(A, F_1) → hSegment(F_1, G_1) → iSegment(G_1, H_1) → jSegment(H_1, I_1) → kSegment(I_1, B) → lVector(A, C) → uTranslate(A, u) → A'Translate(F_1, u) → ESegment(A', E) → h'Translate(F_1, u) → FTranslate(G_1, u) → GSegment(F, G) → i'Translate(G_1, u) → HTranslate(H_1, u) → ISegment(H, I) → j'Translate(H_1, u) → JTranslate(I_1, u) → KSegment(J, K) → k'Translate(I_1, u) → LTranslate(B, u) → B'Segment(L, B') → l'
AI Drawing Prompt Reference
Draw a rectangle and then translate it along a vector to create a rectangle translation tessellation. First, draw two sides of the rectangle, then construct the perpendicular lines of these sides and find their intersection points to form a new rectangle. Next, draw the sides of the new rectangle, construct a vector, and translate the vertices of the original rectangle along this vector to generate new vertices, and connect these vertices to form a new rectangle. Repeat this process to create the tessellation pattern.
The prompt above was compiled from the original drawing commands and is for reference only.