
A 60-degree rhombus in a 60-degree isosceles trapezoid
Loading the math board and drawing, please wait…
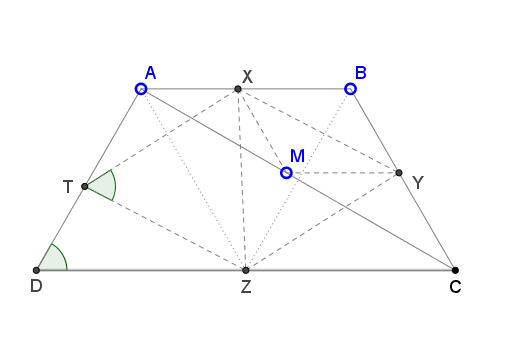
①This example demonstrates how a rhombus with a 60-degree angle is precisely embedded inside an isosceles trapezoid that also has a 60-degree base angle, revealing the geometric relationships between their side lengths and angles. ②Core mathematical concepts include properties of rhombi and isosceles trapezoids, special 60-degree angles, rotation and symmetry transformations, and the use of intersection and midpoint relations in geometric construction. ③Construction highlights: from the summary, the GeoGebra commands used include Circle, Rotate, Ray, Segment, Intersect, Line, Midpoint, Angle, Point, Distance, and OrthogonalLine. The rhombus is constructed via a 60-degree rotation, and the nesting position is determined using intersection points and midpoints. ④This is suitable for middle or high school geometry lessons, geometric construction practice, or as a dynamic geometry demonstration for exploring nested polygons with special angles.
GeoGebra Commands & Parameters
Circle(B, A) → eRotate(A, 120°, B) → A'Ray(B, A') → gSegment(A, B) → fIntersect(e, g) → C,Segment(B, C) → hLine(C, f) → iRotate(B, (-(120°)), A) → B'Ray(A, B') → jIntersect(i, j) → DSegment(A, D) → kSegment(D, C) → lCircle(C, B) → cSegment(A, C) → nMidpoint(D, C) → ZAngle(C, D, A) → βPoint(n) → MLine(M, h) → j_1Line(M, l) → k_1Intersect(j_1, f) → XIntersect(k_1, h) → YSegment(X, M) → l_1Segment(M, Y) → m_1Circle(A, Distance[B, X]) → c_1Intersect(c_1, k, 1) → TSegment(T, X) → n_1Segment(X, Y) → p_1Line(Y, n_1) → q_1Line(T, p_1) → r_1Segment(T, Z) → mSegment(Z, Y) → pSegment(A, Z) → qSegment(Z, B) → rDistance(T, X) → TXOrthogonalLine(Z, h) → sOrthogonalLine(Z, k) → tAngle(Z, T, X) → αSegment(X, Z) → aRay(Z, A) → bCircle(A, D) → dDistance(B, Y) → BYDistance(C, Y) → CY
AI Drawing Prompt Reference
Draw a 60-degree rhombus inside a 60-degree isosceles trapezoid, showing the geometric relationships between their side lengths and angles. Construct the rhombus by rotating a segment 60 degrees, positioning it using intersection points and midpoints. Start with a circle containing the rhombus vertices, then rotate and draw lines, and finalize by sketching the trapezoid and rhombus, labeling key angles and segment lengths.
The prompt above was compiled from the original drawing commands and is for reference only.