
棱镜色散
几何画板及绘图内容加载中,请稍等……
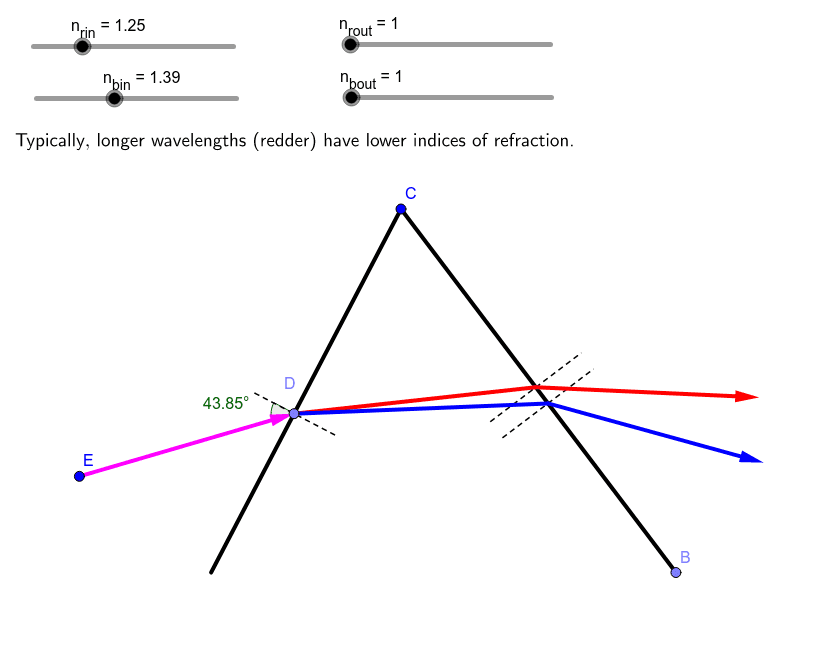
此范例演示棱镜如何使光线发生色散。核心概念包括光的折射和棱镜的几何形状。通过使用GeoGebra命令如Point, Intersect, Segment等,可以动态展示光线在棱镜中的路径变化。适合高中物理和数学教学。
GeoGebra 命令及参数
Point(xAxis) → BIntersect(xAxis, yAxis) → ASegment(C, A) → cSlope(c) → m_cPoint(c) → DCircleSector(D, D - (Length[c] * (1, (-1) / m_c)), A) → kSegment(C, B) → bPointIn(k) → EVector(E, D) → uSlope(b) → m_bSegment(D_{plus}, D_{minus}) → aAngle(E, D, D_{minus}) → daRotate(D_{plus}, (db / 180 * π), D) → FRay(D, F) → dIntersect(d, b) → GSegment(D, G) → eSegment(G_{minus}, G_{plus}) → fAngle(D, G, G_{minus}) → gaRotate(G_{plus}, (((-gb)) / 180 * π), G) → HVector(G, G + (Vector[G, H] / Length[Vector[G, H]] * Length[u])) → gRotate(D_{plus}, (db2 / 180 * π), D) → IRay(D, I) → hIntersect(h, b) → JSegment(J_{minus}, J_{plus}) → iAngle(D, J, J_{minus}) → jaRotate(J_{plus}, (((-jb)) / 180 * π), J) → KVector(J, J + (Vector[J, K] / Length[Vector[J, K]] * Length[u])) → wSegment(D, J) → jLaTeX("\text{Typically, longer wavelengths (redder) have lower indices of refraction.}") → text1
AI 绘图提示语参考
画一个棱镜,展示光线通过棱镜的折射和色散现象。先画出棱镜的轮廓,然后从棱镜的一个顶点发出光线,光线在棱镜内部发生折射,并在出射时分解成不同颜色的光。用动态方式显示光线的路径,并标注关键角度和向量,说明色散原理。
以上提示语为根据原始绘图命令整理而来,仅供参考。