
Construction: Perpendicular Bisector of a Line Segment
Loading the math board and drawing, please wait…
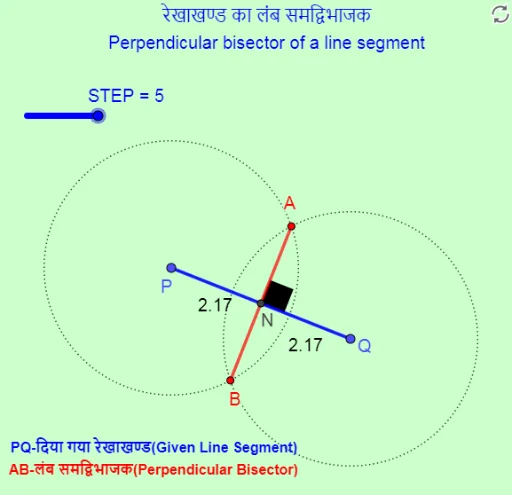
This GeoGebra example demonstrates the step-by-step construction of the perpendicular bisector of a given line segment, illustrating that every point on the bisector is equidistant from the segment's endpoints. The core mathematical concepts include line segments, perpendicularity, bisection, circles, and intersection points, along with midpoint, angle, and text annotations. The construction uses GeoGebra commands such as Segment to create segment PQ, Point to mark endpoints, Circle to draw equal-radius circles centered at P and Q, Intersect to find the circle intersections, Midpoint to locate the segment's midpoint, Angle to mark the right angle, and Text to add explanatory labels. This resource is ideal for middle school geometry lessons, helping students grasp the principles of compass-and-straightedge construction and the perpendicular bisector theorem, and can be used for dynamic verification of the property.
GeoGebra Commands & Parameters
Segment(P, Q) → fPoint(f) → A_1Circle(P, Segment[P, A_1]) → cCircle(Q, Segment[P, A_1]) → dIntersect(d, c) → B, A, ,Segment(A, B) → gIntersect(f, g) → NSegment(P, N) → hSegment(N, Q) → iAngle(Q, N, A) → αText(h) → t1Text(i) → t2Midpoint(h) → LMidpoint(i) → M
AI Drawing Prompt Reference
Draw a horizontal line segment with endpoints labeled P and Q. Pick a point on the segment, then draw a circle centered at P with radius equal to the distance from P to that point, and another circle centered at Q with the same radius. These two circles intersect at two points, one above and one below the segment. Connect these two intersection points with a straight line, which crosses the original segment at its midpoint. From this midpoint, draw two small segments to P and Q respectively, and mark a right angle at the midpoint. Finally, add text labels next to these two small segments and mark their midpoints.
The prompt above was compiled from the original drawing commands and is for reference only.