
Construct a Rectangle with Given Area (One Given Side)
Loading the math board and drawing, please wait…
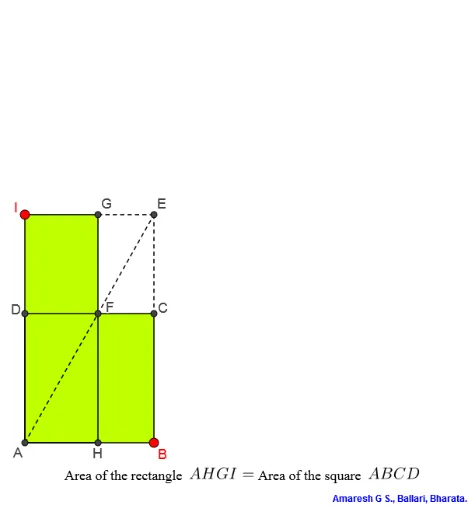
This example demonstrates how to construct a rectangle with a given area, equal to the area of a given square. Key mathematical concepts include geometric construction, similar triangles, and geometric mean. Using GeoGebra commands such as Intersect, Point, Circle, Segment, and Polygon, this construction can be achieved. Suitable for middle school and above students to learn geometric construction and area calculation.
GeoGebra Commands & Parameters
Intersect(xAxis, yAxis) → APoint(xAxis) → C_1Circle(A, 5) → cIntersect(c, xAxis, 2) → B_1Segment(C_1, B_1) → fPoint(f) → BPolygon(A, B, 4) → poly1, g, h, i, j, C, DCircle(A, Distance[A, B] + 5) → dIntersect(d, yAxis, 2) → F_1Circle(A, 1) → eIntersect(e, yAxis) → G_1, H_1Segment(H_1, F_1) → kPoint(k) → IOrthogonalLine(I, yAxis) → lOrthogonalLine(B, xAxis) → mIntersect(l, m) → ESegment(I, A) → pSegment(A, E) → qIntersect(i, q) → FOrthogonalLine(F, l) → rIntersect(l, r) → GIntersect(r, g) → HPolygon(A, H, G, I) → q1, a, m_1, l_1, i_1Segment(I, E) → sRay(A, E) → tRay(D, C) → bRay(I, E) → f_1Ray(A, B) → g_1Intersect(t, b) → NOrthogonalLine(N, xAxis) → h_1Intersect(h_1, f_1) → OIntersect(h_1, g_1) → PPolygon(A, P, O, I) → q2, a_1, p_1, o, i_2Segment(E, N) → k_1Segment(I, O) → q_1Segment(A, P) → r_1Segment(G, F) → s_1Segment(N, O) → n_1Segment(O, P) → t_1Segment(C, N) → j_1Segment(E, C) → nSegment(C, B) → b_1Segment(C, D) → c_1Segment(B, A) → d_1Segment(D, A) → e_1Segment(G, E) → f_2Intersect(k_1, q) → JIntersect(q, b_1) → K
AI Drawing Prompt Reference
Draw a rectangle with a given area where one side is known. Start by plotting a circle at the origin and find its intersection with the x-axis. Connect this point to the origin to form one side of the rectangle. Then, construct a rectangle with the same area as a given square using this side. Next, draw a larger circle centered at the origin and find its intersection with the y-axis. Connect these points to complete the rectangle. Finally, add some auxiliary line segments and rays to enhance the shape.
The prompt above was compiled from the original drawing commands and is for reference only.