
Congruent Triangles Exercise 2
Loading the math board and drawing, please wait…
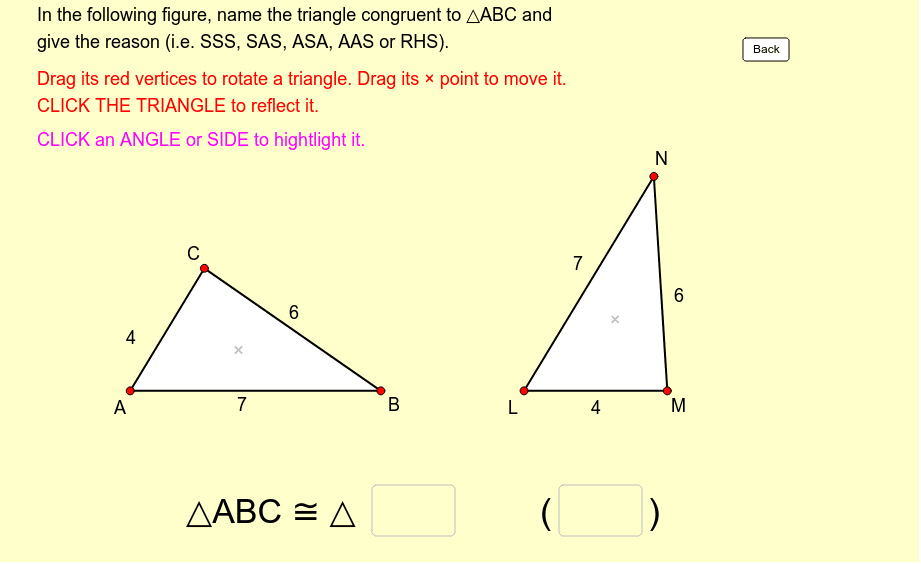
This example demonstrates how to name congruent triangles and provide reasons. Users can move, rotate, and reflect the triangles. Using GeoGebra commands such as Polygon, Vector, Angle, Intersect, Textfield, Segment, Midpoint, and Rotate, one can construct and verify congruent triangles. Suitable for middle school and above students to learn about geometric transformations and congruent triangles.
GeoGebra Commands & Parameters
Polygon(A, B, C) → poly1, c, a, bVector(P, A) → uVector(P, B) → vVector(P, C) → wPolygon(A_1, B_1, C_1) → poly1_1, c_1, a_1, b_1Vector(P_1, A_1) → u_1Vector(P_1, B_1) → v_1Vector(P_1, C_1) → w_1Angle(B, A, C) → αAngle(A, C, B) → βAngle(A_1, C_1, B_1) → γAngle(B_1, A_1, C_1) → δIntersect(Circle[X_0, Side_b], Circle[Y_0, Side_a]) → Z_0, L, ,Polygon(X_0, Y_0, Z_0) → poly2, z_0, x_0, y_0Textfield(text13) → Ans1Textfield(text14) → Ans2Segment(D, E) → rMidpoint(Segment[Intersect[Circle[A, r], b], Intersect[Circle[A, r], c]]) → FMidpoint(Segment[Intersect[Circle[C, r], a], Intersect[Circle[C, r], b]]) → GMidpoint(Segment[Intersect[Circle[A_1, r], b_1], Intersect[Circle[A_1, r], c_1]]) → HMidpoint(Segment[Intersect[Circle[C_1, r], a_1], Intersect[Circle[C_1, r], b_1]]) → IAngle(A_1, B_1, C_1) → εAngle(C, B, A) → ζMidpoint(Segment[Intersect[Circle[B, r], a], Intersect[Circle[B, r], c]]) → JMidpoint(Segment[Intersect[Circle[B_1, r], a_1], Intersect[Circle[B_1, r], c_1]]) → KRotate(Translate[Mirror[X_0, x = 0], translate], -(180° - Angle[Y_0, X_0, Z_0]), (11, 0)) → X_1Rotate(Translate[Mirror[Y_0, x = 0], translate], -(180° - Angle[Y_0, X_0, Z_0]), (11, 0)) → Y_1Rotate(Translate[Mirror[Z_0, x = 0], translate], -(180° - Angle[Y_0, X_0, Z_0]), (11, 0)) → Z_1
AI Drawing Prompt Reference
Draw two congruent triangles ABC and A₁B₁C₁. Use point P to translate and rotate triangle ABC to form A₁B₁C₁. Construct corresponding sides and angles, and use midpoints and rotations to ensure the triangles are congruent. Start by drawing triangle ABC, then translate and rotate it using point P.
The prompt above was compiled from the original drawing commands and is for reference only.