
Balance Beam Equations
Loading the math board and drawing, please wait…
In collections
Numeracy Practice
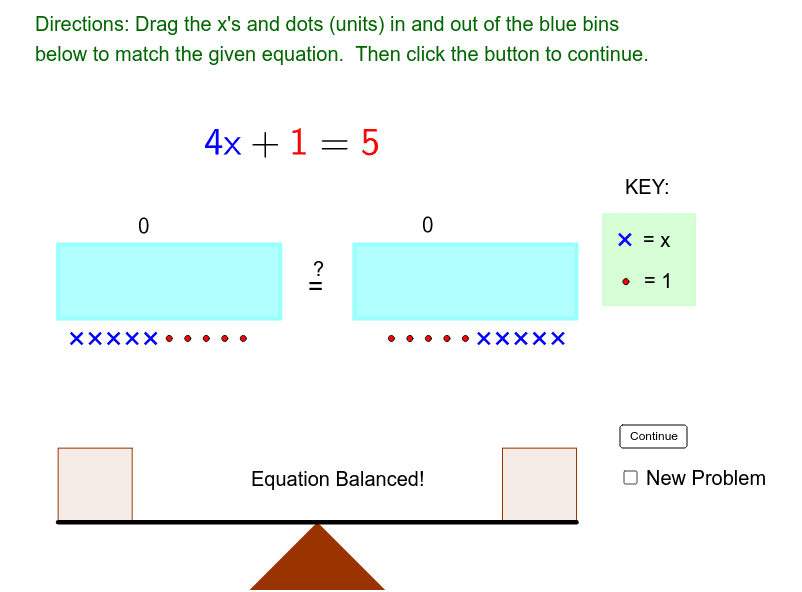
This example uses a balance beam model to help students understand equations. Key mathematical concepts include the principle of equation balance. The construction uses GeoGebra commands such as Element, Polygon, OrthogonalLine, etc. Suitable for middle school and above students to learn about equation balance.
GeoGebra Commands & Parameters
Element(LeftSideUnitList, ProblemPicker) → LeftUnitFromListElement(RightSideUnitList, ProblemPicker) → RightUnitFromListElement(RightSideXList, ProblemPicker) → RightXFromListElement(LeftSideXList, ProblemPicker) → LeftXFromListPolygon(FulcrumBottomLeft, FulcrumTop, FulcrumBottomRight) → poly1, fulcrumbottomright, fulcrumbottomleft, fulcrumtopOrthogonalLine(A_11, fulcrumtop) → b_2Point(b_2) → RightUnit5OrthogonalLine(A_12, fulcrumtop) → a_2Point(a_2) → RightUnit4OrthogonalLine(A_13, fulcrumtop) → t_1Point(t_1) → RightUnit3OrthogonalLine(A_14, fulcrumtop) → s_1Point(s_1) → RightUnit2OrthogonalLine(A_15, fulcrumtop) → r_1Point(r_1) → RightUnit1Sum({(y(RightUnit1) > ExpressionLowerLimit) ∧ (y(RightUnit1) < ExpressionUpperLimit), (y(RightUnit2) > ExpressionLowerLimit) ∧ (y(RightUnit2) < ExpressionUpperLimit), (y(RightUnit3) > ExpressionLowerLimit) ∧ (y(RightUnit3) < ExpressionUpperLimit), (y(RightUnit4) > ExpressionLowerLimit) ∧ (y(RightUnit4) < ExpressionUpperLimit), (y(RightUnit5) > ExpressionLowerLimit) ∧ (y(RightUnit5) < ExpressionUpperLimit)}) → SumRightSideUnitOrthogonalLine(A_20, fulcrumtop) → q_1Point(q_1) → LeftUnit1OrthogonalLine(A_19, fulcrumtop) → p_1Point(p_1) → LeftUnit2OrthogonalLine(A_18, fulcrumtop) → n_1Point(n_1) → LeftUnit3OrthogonalLine(A_17, fulcrumtop) → m_1Point(m_1) → LeftUnit4OrthogonalLine(A_16, fulcrumtop) → l_1Point(l_1) → LeftUnit5Sum({(y(LeftUnit1) > ExpressionLowerLimit) ∧ (y(LeftUnit1) < ExpressionUpperLimit), (y(LeftUnit2) > ExpressionLowerLimit) ∧ (y(LeftUnit2) < ExpressionUpperLimit), (y(LeftUnit3) > ExpressionLowerLimit) ∧ (y(LeftUnit3) < ExpressionUpperLimit), (y(LeftUnit4) > ExpressionLowerLimit) ∧ (y(LeftUnit4) < ExpressionUpperLimit), (y(LeftUnit5) > ExpressionLowerLimit) ∧ (y(LeftUnit5) < ExpressionUpperLimit)}) → SumLeftSideUnitOrthogonalLine(A_6, fulcrumtop) → k_1Point(k_1) → RightX5OrthogonalLine(A_7, fulcrumtop) → j_1Point(j_1) → RightX4OrthogonalLine(A_8, fulcrumtop) → g_1Point(g_1) → RightX3OrthogonalLine(A_9, fulcrumtop) → c_1Point(c_1) → RightX2OrthogonalLine(A_10, fulcrumtop) → b_1Point(b_1) → RightX1Sum({(y(RightX1) > ExpressionLowerLimit) ∧ (y(RightX1) < ExpressionUpperLimit), (y(RightX2) > ExpressionLowerLimit) ∧ (y(RightX2) < ExpressionUpperLimit), (y(RightX3) > ExpressionLowerLimit) ∧ (y(RightX3) < ExpressionUpperLimit), (y(RightX4) > ExpressionLowerLimit) ∧ (y(RightX4) < ExpressionUpperLimit), (y(RightX5) > ExpressionLowerLimit) ∧ (y(RightX5) < ExpressionUpperLimit)}) → SumRightSideXOrthogonalLine(A_5, fulcrumtop) → tPoint(t) → LeftX5OrthogonalLine(A_4, fulcrumtop) → sPoint(s) → LeftX4OrthogonalLine(A_3, fulcrumtop) → rPoint(r) → LeftX3OrthogonalLine(A_2, fulcrumtop) → qPoint(q) → LeftX2OrthogonalLine(A_1, fulcrumtop) → pPoint(p) → LeftX1Sum({(y(LeftX1) > ExpressionLowerLimit) ∧ (y(LeftX1) < ExpressionUpperLimit), (y(LeftX2) > ExpressionLowerLimit) ∧ (y(LeftX2) < ExpressionUpperLimit), (y(LeftX3) > ExpressionLowerLimit) ∧ (y(LeftX3) < ExpressionUpperLimit), (y(LeftX4) > ExpressionLowerLimit) ∧ (y(LeftX4) < ExpressionUpperLimit), (y(LeftX5) > ExpressionLowerLimit) ∧ (y(LeftX5) < ExpressionUpperLimit)}) → SumLeftSideXIf(BeamLeftTotal > BeamRightTotal, -1, If[BeamLeftTotal ≟ BeamRightTotal, 0, 1]) → BeamLeftYValueSegment(BeamLeft, BeamRight) → aLine(BeamLeft, BeamRight) → bPoint(b) → APoint(b) → BOrthogonalLine(A, b) → cOrthogonalLine(BeamLeft, b) → dOrthogonalLine(BeamRight, a) → eOrthogonalLine(B, b) → fPoint(c) → COrthogonalLine(C, c) → gIntersect(d, g) → DIntersect(e, g) → EIntersect(f, g) → FPolygon(C, A, BeamLeft, D) → poly2, LeftBasketLeftSide, LeftBasketBottomSide, LeftBasketRightSide, LeftBasketTopSidePolygon(BeamRight, B, F, E) → poly3, RightBasketBottomSide, RightBasketRightSide, RightBasketTopSide, RightBasketLeftSideSegment(A, B) → hPolygon(H, J, M, L) → poly4, h_1, LeftExpressionBottom, m, lPolygon(N, O, K, I) → poly5, n, RightExpressionBottom, k, iPoint(Circle[FulcrumBottomLeft, -7]) → PSegment(FulcrumBottomLeft, P) → a_1OrthogonalLine(A_10, fulcrumtop) → d_1OrthogonalLine(A_9, fulcrumtop) → e_1OrthogonalLine(A_9, fulcrumtop) → f_1OrthogonalLine(A_8, fulcrumtop) → i_1Sum({(y(LeftX1) > ExpressionLowerLimit) ∧ (y(LeftX1) < ExpressionUpperLimit), (y(LeftX2) > ExpressionLowerLimit) ∧ (y(LeftX2) < ExpressionUpperLimit), (y(LeftX3) > ExpressionLowerLimit) ∧ (y(LeftX3) < ExpressionUpperLimit), (y(LeftX4) > ExpressionLowerLimit) ∧ (y(LeftX4) < ExpressionUpperLimit), (y(LeftX5) > ExpressionLowerLimit) ∧ (y(LeftX5) < ExpressionUpperLimit)}) → LeftSideXTotalIf(BeamLeftYValue ≟ 0, "Equation Balanced!", "Not Balanced") → text7Element(RightSideXList, 2) → jElement(RightSideXList, 1) → TestSegment(S, TRC) → c_2OrthogonalLine(S, c_2) → d_2Point(d_2) → TOrthogonalLine(T, d_2) → e_2OrthogonalLine(TRC, c_2) → f_2Intersect(e_2, f_2) → UPolygon(S, T, U, TRC) → poly6, s_2, t_2, u, trc
AI Drawing Prompt Reference
Draw a balance beam model to illustrate the principle of equation balance. Start with a fulcrum at the top of the beam, then draw multiple units vertically extending from both sides of the fulcrum, representing terms on both sides of an equation. Differentiate the units on the left and right sides with colors or shapes. Ensure the units on both sides are balanced in number, position, and shape. First draw the beam and fulcrum, then add the units, and finally connect corresponding units with dashed lines or arrows to emphasize the balance.
The prompt above was compiled from the original drawing commands and is for reference only.