
Amatteson-Rhombus
Loading the math board and drawing, please wait…
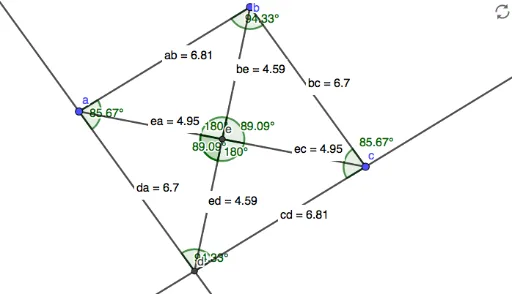
This example demonstrates the geometric properties of a rhombus. Key mathematical concepts include the properties of a rhombus, angles, and distances. Using GeoGebra commands such as Segment, Line, and Intersect, the construction of a rhombus and the measurement of its side lengths and angles are illustrated. Suitable for students at the junior high school level and above to learn about the geometric construction and properties of a rhombus.
GeoGebra Commands & Parameters
Segment(a, b) → fSegment(b, c) → gLine(c, f) → hLine(a, g) → iIntersect(h, i) → dAngle(a, b, c) → αAngle(c, d, a) → βAngle(d, a, b) → γAngle(b, c, d) → δDistance(a, b) → distanceabDistance(b, c) → distancebcDistance(c, d) → distancecdDistance(d, a) → distancedaSegment(b, d) → jSegment(a, c) → kIntersect(j, k) → eDistance(b, e) → distancebeDistance(e, d) → distanceedDistance(e, c) → distanceecDistance(e, a) → distanceeaAngle(a, e, c) → εAngle(b, e, d) → ζAngle(c, e, b) → ηAngle(a, e, d) → θ
AI Drawing Prompt Reference
Draw a rhombus using points A, B, C, and D. Start by drawing line segments AB and BC, then draw a perpendicular line through point C to line AB, and another perpendicular line through point A to line BC, which intersect at point D. Measure the lengths of AB, BC, CD, and DA, as well as the angles at A, B, C, and D.
The prompt above was compiled from the original drawing commands and is for reference only.