
Trigonometry - Unit Circle - 10 Degree Increments
Loading the math board and drawing, please wait…
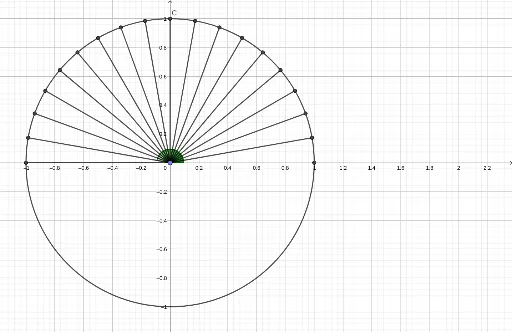
This example demonstrates the values of trigonometric functions on the unit circle, using 10-degree increments. Key mathematical concepts include trigonometric functions, unit circle, and angles. GeoGebra commands such as Point, Intersect, Rotate, Angle, and Segment are used in construction. Suitable for high school math education to help students understand the periodicity and symmetry of trigonometric functions.
GeoGebra Commands & Parameters
Point(yAxis) → AIntersect(c, xAxis, 2) → BRotate(B, 10°, A) → B'Angle(B, A, B') → αSegment(A, B') → fRotate(B, 20°, A) → B'_1Angle(B, A, B'_1) → βSegment(A, B'_1) → gRotate(B, 30°, A) → B'_2Angle(B, A, B'_2) → γSegment(A, B'_2) → hRotate(B, 40°, A) → B'_3Angle(B, A, B'_3) → δSegment(A, B'_3) → iRotate(B, 50°, A) → B'_4Angle(B, A, B'_4) → εSegment(A, B'_4) → jRotate(B, 60°, A) → B'_5Angle(B, A, B'_5) → ζSegment(A, B'_5) → kRotate(B, 70°, A) → B'_6Angle(B, A, B'_6) → ηSegment(A, B'_6) → lRotate(B, 80°, A) → B'_7Angle(B, A, B'_7) → θSegment(A, B'_7) → mIntersect(c, yAxis, 2) → CSegment(A, C) → nRotate(B, 100°, A) → B'_8Angle(B, A, B'_8) → ιSegment(A, B'_8) → pRotate(B, 110°, A) → B'_9Angle(B, A, B'_9) → κSegment(A, B'_9) → qRotate(B, 120°, A) → B'_{10}Angle(B, A, B'_{10}) → λSegment(A, B'_{10}) → rRotate(B, 130°, A) → B'_{11}Angle(B, A, B'_{11}) → μSegment(A, B'_{11}) → sRotate(B, 140°, A) → B'_{12}Angle(B, A, B'_{12}) → νSegment(A, B'_{12}) → tRotate(B, 150°, A) → B'_{13}Angle(B, A, B'_{13}) → ξSegment(A, B'_{13}) → aRotate(B, 160°, A) → B'_{14}Angle(B, A, B'_{14}) → οSegment(A, B'_{14}) → bRotate(B, 170°, A) → B'_{15}Angle(B, A, B'_{15}) → ρSegment(A, B'_{15}) → dIntersect(c, xAxis, 1) → DSegment(A, D) → e
AI Drawing Prompt Reference
Draw a unit circle and mark sine and cosine values at 10-degree increments. Start by creating point A on the y-axis, then use point B on the x-axis intersection with the circle to generate points B' at 10-degree, 20-degree, 30-degree angles through rotation, and connect A with each B' to form rays, marking the sine and cosine values for each angle. Finally, complete the diagram at the other intersection point C with the y-axis.
The prompt above was compiled from the original drawing commands and is for reference only.