
Rectangle (Dikdörtgen) Geometric Construction and Interior Angles
Loading the math board and drawing, please wait…
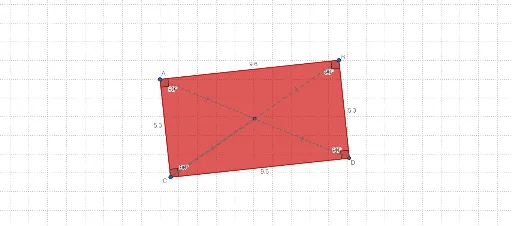
This GeoGebra example demonstrates how to construct a rectangle step-by-step using geometric tools, and visualizes its interior angles and sides. The core mathematical concepts include the definition of a rectangle (four right angles, opposite sides parallel and equal), basic geometric constructions, and angle measurement. The construction uses commands such as Segment to create AB, Rotate and Angle to form right angles, OrthogonalLine and Intersect to determine perpendicular lines and intersection points, Polygon to form the rectangle, and InteriorAngles to display angle measures. This example is suitable for middle school geometry lessons, helping students understand the construction process and properties of rectangles, and can be used for teacher demonstrations or student self-exploration.
GeoGebra Commands & Parameters
Segment(A, B) → fRotate(B, (-(90°)), A) → B'Angle(B', A, B) → αLine(A, B') → gPoint(g) → CSegment(C, A) → hRotate(A, 90°, B) → A'Angle(A, B, A') → βLine(B, A') → iOrthogonalLine(C, i) → jIntersect(j, i) → DSegment(C, D) → kSegment(D, B) → lPolygon(A, B, D, C) → q1, a, b, d, cInteriorAngles(q1) → γ, δ, ε, ζSegment(C, B) → mSegment(A, D) → nIntersect(m, n) → ESegment(A, E) → pSegment(E, C) → qSegment(E, B) → rSegment(E, D) → s
AI Drawing Prompt Reference
Draw a rectangle starting with a horizontal base segment. From its left endpoint, rotate the right endpoint counterclockwise by 90 degrees to create a vertical ray, and place a point on this ray as one vertex. From the right endpoint, rotate the left endpoint clockwise by 90 degrees to create another vertical ray, then draw a perpendicular line through the chosen point to intersect this ray, giving the fourth vertex. Connect all four vertices to form the rectangle, and display the measure of each interior angle. Finally, draw both diagonals, mark their intersection, and connect this intersection point to all four vertices.
The prompt above was compiled from the original drawing commands and is for reference only.