
假设检验选择器
几何画板及绘图内容加载中,请稍等……
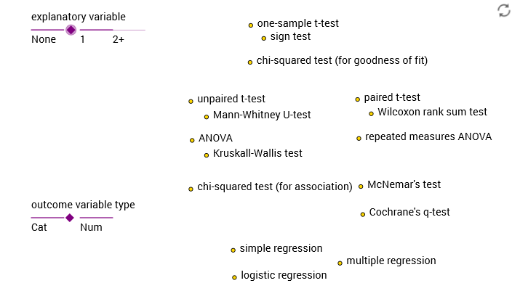
这个范例演示了如何选择合适的假设检验方法。它涉及统计学中的核心概念,如假设检验、中位数、统计特征等。通过使用GeoGebra命令如Point、Text、Segment等,用户可以直观地理解假设检验的过程。适合统计学和概率论课程使用。
GeoGebra 命令及参数
Point(yAxis) → L2Point(Segment[(l_1, y(L2)), (r_2, y(L2))]) → P2Point(yAxis) → L1Point(Segment[(l_1, y(L1)), (f_2, y(L1))]) → P1Text(B2, A2 + testnameoffset) → C2Text(B3, A3 + testnameoffset) → C3Text(B6, A6 + testnameoffset) → C6Text(B7, A7 + testnameoffset) → C7Text(B8, A8 + testnameoffset) → C8Text(B10, A10 + testnameoffset) → C10Text(B11, A11 + testnameoffset) → C11Text(B12, A12 + testnameoffset) → C12Text(B13, A13 + testnameoffset) → C13Text(B14, A14 + testnameoffset) → C14Text(B1, A1 + testnameoffset) → C1Text(B4, A4 + testnameoffset) → C4Text(B15, A15 + testnameoffset) → C15Segment((l_1, y(L1)), (l_2, y(L1))) → M1Segment((r_1, y(L1)), (r_2, y(L1))) → N1Point(yAxis) → L3Segment((l_1, y(L2)), (l_2, y(L2))) → M2Segment((r_1, y(L2)), (r_2, y(L2))) → N2Segment((l_1, y(L3)), (l_2, y(L3))) → M3Point(yAxis) → L4Segment((r_1, y(L3)), (r_2, y(L3))) → N3Segment((l_1, y(L4)), (l_2, y(L4))) → M4Segment((r_1, y(L4)), (r_2, y(L4))) → N4Point(yAxis) → L5Segment((l_1, y(L5)), (l_2, y(L5))) → M5Segment((r_1, y(L5)), (r_2, y(L5))) → N5Text(K1, L1 + titleoffset) → Q1Text(K2, L2 + titleoffset) → Q2Text(K3, L3 + titleoffset) → Q3Text(K5, L5 + titleoffset) → Q5Text("Cat", L2 + llabeloffset) → R2Text("Cat", L3 + llabeloffset) → R3Text("2", L4 + llabeloffset) → R4Text("Norm", L5 + llabeloffset) → R5Text("Num", L2 + rlabeloffset) → S2Text("Num", L3 + rlabeloffset) → S3Text("3+", L4 + rlabeloffset) → S4Text("Nonnorm", L5 + rlabeloffset) → S5Text(K4, L4 + titleoffset) → Q4Point(Segment[(l_1, y(L3)), (r_2, y(L3))]) → P3Point(Segment[(l_1, y(L4)), (r_2, y(L4))]) → P4Point(Segment[(l_1, y(L5)), (r_2, y(L5))]) → P5Text(B5, A5 + testnameoffset) → C5Segment((f_1, y(L1)), (f_2, y(L1))) → O1Text("2+", L1 + flabeloffset) → T1Text("None", L1 + llabeloffset) → R1Text("1", L1 + rlabeloffset) → S1Text(B16, A16 + testnameoffset) → C16Point(yAxis) → L6Segment((l_1, y(L6)), (l_2, y(L6))) → M6Segment((r_1, y(L6)), (r_2, y(L6))) → N6Point(Segment[(l_1, y(L6)), (r_2, y(L6))]) → P6Text(K6, L6 + titleoffset) → Q6Text("Group", L6 + llabeloffset) → R6Text("Repeat", L6 + rlabeloffset) → S6Text(B9, A9 + testnameoffset) → C9
AI 绘图提示语参考
绘制一个坐标系,y轴上依次放置五个点L1至L5,分别代表不同类型的假设检验。L1和L2之间画两条垂直线M1和N1,L2和L3之间画M2和N2,L3和L4之间画M3,L4和L5之间画M4和N4。在L1、L2、L3、L4、L5上方分别放置标题Q1、Q2、Q3、Q4、Q5,内容分别为“Cat”、“Cat”、“2”、“Norm”、“Num”。在L2和L3的右侧分别放置文本R2和R3,内容为“Cat”,在L4的右侧放置文本S4,内容为“3+”,在L5的右侧放置文本S5,内容为“Nonnorm”。在L3、L4、L5上分别放置点P3、P4、P5,L1、L2、L3、L4、L5左侧分别放置文本Q1、Q2、Q3、Q4、Q5,内容分别为“Cat”、“Cat”、“2”、“Norm”、“Num”。
以上提示语为根据原始绘图命令整理而来,仅供参考。