
Surface Area of Rectangular Prisms by Duane Habecker
Loading the math board and drawing, please wait…
In collections
Surface Area and Volume of basic figures
Surface Area and Volume of basic figures
Surface Area and Volume of basic figures
surface nets
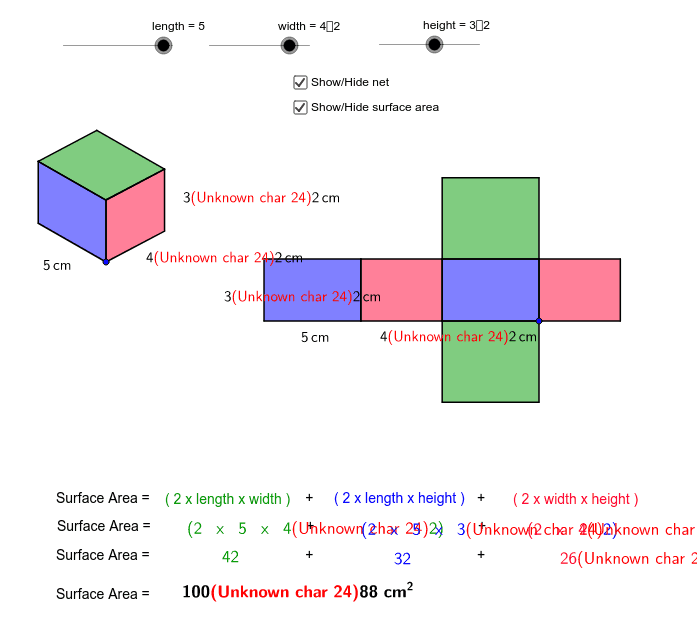
① This example demonstrates the net of a rectangular prism, visually showing how to compute its surface area. ② Core math concepts include solid geometry of rectangular prisms, the surface area formula, and the correspondence between the 3‑D solid and its 2‑D net. ③ Construction highlights: the applet uses Vector, Translate, Polygon, Line, Intersect, and Midpoint commands together with parameters length, width, height and points A, B, C, D, E, F, G to build the six faces and arrange them as a net. ④ Suitable for middle‑school (grades 7‑9) solid geometry lessons, as well as high‑school review or geometric construction practice.
GeoGebra Commands & Parameters
Vector(A, B) → uVector(A, C) → vVector(A, D) → wTranslate(E, Vector[height * u]) → E'Vector(E, E') → zTranslate(E, Vector[width * w]) → E'_1Translate(E, Vector[length * v]) → E'_2Translate(E'_2, Vector[height * u]) → FTranslate(E'_1, Vector[height * u]) → GPolygon(F, E'_2, E, E') → poly1, f, e'_2, e, e'Polygon(E, E'_1, G, E') → poly2, e_1, e'_1, g, e'_3Line(F, g) → dLine(G, e') → hIntersect(d, h) → HPolygon(F, E', G, H) → poly3, f_1, e'_4, g_1, h_1Polygon(J, I, K, L) → poly4, j, i, k, lPolygon(N, J, I, M) → poly5, n, j_1, i_1, mPolygon(N, P, O, M) → poly6, n_1, p, o, m_1Polygon(Q, R, N, J) → poly7, q, r, n_2, j_2Polygon(T, S, I, M) → poly8, t, s, i_2, m_2Polygon(V, U, O, P) → poly9, v_1, u_1, o_1, p_1Midpoint(e'_2) → WMidpoint(e_1) → ZMidpoint(e'_1) → A_1Midpoint(v_1) → B_1Midpoint(u_1) → C_1Midpoint(o) → D_1Midpoint(m_2) → E_1Midpoint(t) → F_1
AI Drawing Prompt Reference
Create a net of a rectangular prism showing how its six faces unfold into a two‑dimensional layout. Begin with a rectangular base, then attach a side rectangle of the same height and width to one edge, and another rectangle of height and length to an adjacent edge. Continue adding the remaining faces so they form a cross‑shaped arrangement: a central rectangle with four surrounding rectangles and one attached to one of them. Label the dimensions for length, width, and height to illustrate the proportions. Ensure each face is clearly outlined and positioned to demonstrate the correspondence between the 3‑D solid and its 2‑D net, suitable for teaching surface area concepts.
The prompt above was compiled from the original drawing commands and is for reference only.