
Constructing a Rhombus
Loading the math board and drawing, please wait…
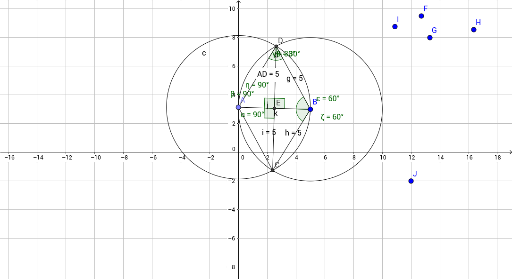
This example demonstrates how to construct a rhombus using GeoGebra. Key mathematical concepts include the properties of a rhombus, vectors, and trigonometric functions. Using commands like Point, Circle, Intersect, Distance, and Segment, the construction of a rhombus and the demonstration of its diagonal properties are shown. Suitable for students in middle school and above learning geometric construction.
GeoGebra Commands & Parameters
Point(yAxis) → ACircle(A, B) → cCircle(B, A) → dIntersect(c, d, 2) → CIntersect(c, d, 1) → DDistance(A, D) → distanceADSegment(A, D) → fSegment(D, B) → gSegment(B, C) → hSegment(C, A) → iDistance(h, f) → aSegment(D, C) → jSegment(A, B) → kIntersect(j, k) → EAngle(A, E, C) → αAngle(D, E, A) → βAngle(A, D, E) → γAngle(D, (NaN, NaN), E) → δAngle(D, B, E) → εAngle(E, B, C) → ζAngle(B, E, D) → ηAngle(E, D, B) → θ
AI Drawing Prompt Reference
Draw a rhombus by first taking point A on the y-axis, then drawing two circles with A and B as their radii. The intersection points C and D are the other two vertices of the rhombus. Connect A to D, D to B, B to C, and C to A to form the rhombus. Measure the length of diagonal AD and draw the diagonals to verify that they bisect each other at right angles.
The prompt above was compiled from the original drawing commands and is for reference only.